tkinter是一个Python包,它封装了tk图形库,最近用tkinter写了一些测试工具,还是挺简洁好用的
tkinter包在Python2版本中名为Tkinter,Python3中更名为tkinter,另外,有个tkinter中有个ttk,这个组件库对原始的组件进行了优化,使界面元素更加好看了,需要注意的是,ttk组件库中相较于tk组件库中的组件,一些属性是不被支持的,使用时需要注意
另外这个tkinter的英文文档:tkinter,还不错
(一)关于grid布局
tkinter中布局有三种方式(Pack,Place,Grid),官方建议使用Grid进行布局,刚开始使用grid进行布局的时候有些棘手的地方就是界面布局时,这行元素长了,那行显示的短了,而且整个页面也会根据内容进行伸缩,虽然说灵活自动调整了,但是有时挺难看的...
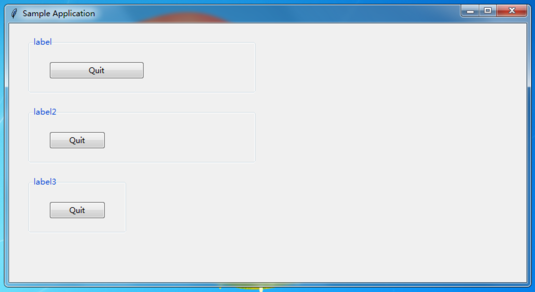
翻看了文档及SF的问题,算是了解了grid布局,下面是一个demo,窗口大小固定的800x400,并且label与label2根据内容的不同进行了扩充空白区域,它们的大小是相等的,其中参数ipadx是为指定组件两边各增加给定数值
如label中的按钮ipadx值为30,其相对默认按钮增加了60px,labelFrame指定了ipadx为70,增加了140px,所以label2中ipadx指定了100,刚好可以跟label框的大小相同,另外padx可以指定左右间距,和css中padding是同理,相应还有pady,ipady,效果同理
代码如下:
#!/bin/env python
# -*- coding: utf-8 -*-

'''
Demo about tkinter's .grid() method <ipadx, padx>
'''

import tkinter as tk
import tkinter.ttk as ttk


class Application(tk.Frame):
    def __init__(self, master=None):
        super(Application, self).__init__(master, width=800, height=400)
        self.grid(sticky=tk.N+tk.S+tk.E+tk.W)
        self.grid_propagate(0)
        self.label()
        self.label2()
        self.label3()
        self.grid_info()

    def label(self):
        lf = ttk.Labelframe(self, text='label')
        lf.grid(padx=(30, 30), pady=(20, 0), ipadx=70)

        quitButton = ttk.Button(lf, text='Quit',
            command=self.quit)
        quitButton.grid(ipadx=(30), padx=(30, 30), pady=(20, 20))

        print('---1---')
        quitButton.update()
        print(quitButton.winfo_width(), quitButton.winfo_height(), lf.winfo_width())

    def label2(self):
        lf = ttk.Labelframe(self, text='label2')
        lf.grid(padx=(30, 30), pady=(20, 0), ipadx=100)

        quitButton = ttk.Button(lf, text='Quit',
            command=self.quit)
        quitButton.grid(padx=(30, 30), pady=(20, 20))
        print('---2---')
        quitButton.update()
        print(quitButton.winfo_width(), quitButton.winfo_height(), lf.winfo_width())


    def label3(self):
        lf = ttk.Labelframe(self, text='label3')
        lf.grid(padx=(30, 30), pady=(20, 0), sticky=tk.W)

        quitButton = ttk.Button(lf, text='Quit',
            command=self.quit)
        quitButton.grid(padx=(30, 30), pady=(20, 20))
        print('---3---')
        quitButton.update()
        print(quitButton.winfo_width(), quitButton.winfo_height(), lf.winfo_width())


    def grid_info(self):

        print(self.grid_size())


app = Application()
app.master.title('Sample Application')
app.mainloop()
(二)组件交互
下面这个小demo,点击hello按钮,按钮文字会变成world,再次点击变成hello,旁边的数字按钮,点击一下数字加1,并且会在程序右侧text面板输出一行记录,并且每隔1s钟,数字会自动加1,右侧也会输出一行记录,这个是用thread实现的,后面有更优雅的补充,clear按钮可以清除右上侧按钮的数字和右侧text面板的数据
代码如下:
#!/bin/env python
# -*- coding: utf-8 -*-

'''
Demo about tkinter's Button and Text
'''

import tkinter as tk
import tkinter.ttk as ttk
from time import strftime
from threading import Thread
import time

def datetime_str():

    '''
    return strftime
    '''

    return strftime('[%Y-%m-%d %H:%M:%S] ')


class Application(tk.Frame):
    def __init__(self, master=None):
        super(Application, self).__init__(master, width=800, height=400)
        self.grid(sticky=tk.N+tk.S+tk.E+tk.W)
        self.grid_propagate(0)
        self.label()
        self.textBox()
        self.start_plusone_with_thread()

    def change_text(self):

        self.button_msg.set('hello' if self.button_msg.get() == 'world' else 'world')

    def plusone(self):

        self.count_msg.set(self.count_msg.get() + 1)
        self.outputText.insert(tk.INSERT, datetime_str() + '+1s\n')
        self.outputText.see("end")

    def clear_msg(self):

        self.count_msg.set(1)
        self.outputText.delete('1.0', tk.END)

    def label(self):

        lf = ttk.Labelframe(self, text='label')
        lf.grid(sticky=tk.N, padx=(30, 30), pady=(20, 0))

        self.button_msg = tk.StringVar()
        self.count_msg = tk.IntVar()

        self.button_msg.set('hello')
        self.count_msg.set(1)

        self.b1 = ttk.Button(lf, textvariable=self.button_msg, command=self.change_text)
        self.b1.grid(row=0, column=0, padx=(30, 30), pady=(20, 0))

        self.b2 = ttk.Button(lf, textvariable=self.count_msg, command=self.plusone)
        self.b2.grid(row=0, column=1, padx=(30, 30), pady=(20, 0))

        self.b3 = ttk.Button(lf, text = 'clear', command=self.clear_msg)
        self.b3.grid(row=1, column=0, padx=(30, 30), pady=(20, 20))

        lf.update()
        print(lf.grid_size())
        print(lf.winfo_width(), lf.winfo_height())

    def textBox(self):

        self.outputText = tk.Text(self, width=50, height=26)
        self.outputText.grid(row=0, column=1, padx=(10, 30), pady=(30, 20))
        self.outputText.update()
        print(self.outputText.winfo_width(), self.outputText.winfo_height())

    def plusone_1s(self):

        while True:
            self.count_msg.set(self.count_msg.get() + 1)
            self.outputText.insert(tk.INSERT, datetime_str() + '+1s\n')
            self.outputText.see("end")
            time.sleep(1)

    def start_plusone_with_thread(self):

        thread = Thread(target=self.plusone_1s)
        thread.daemon = True
        thread.start()


app = Application()
app.master.title('Sample Application')
app.mainloop()
(三)文本框拖拽条
最开始向Text组件输出数据时,超出下边框的数据默认不会自动滚动,不过这个挺好解决的,使用 self.outputText.see("end") 就可以总是显示最后一行
在网上看到一个例子,他是使用pack布局的,不过里面有个定时输出的用法,还是挺不错的,可以替换(二)中的线程代码,更加简单优雅
代码如下:
import time
try:
    # python 2.x
    import Tkinter as tk
except ImportError:
    # python 3.x
    import tkinter as tk

class Example(tk.Frame):
    def __init__(self, *args, **kwargs):
        tk.Frame.__init__(self, *args, **kwargs)

        self.text = tk.Text(self, height=6, width=40)
        self.vsb = tk.Scrollbar(self, orient="vertical", command=self.text.yview)
        self.text.configure(yscrollcommand=self.vsb.set)
        self.vsb.pack(side="right", fill="y")
        self.text.pack(side="left", fill="both", expand=True)

        self.add_timestamp()

    def add_timestamp(self):
        self.text.insert("end", time.ctime() + "\n")
        self.text.see("end")
        self.after(1000, self.add_timestamp)

if __name__ == "__main__":
    root =tk.Tk()
    frame = Example(root)
    frame.pack(fill="both", expand=True)
    root.mainloop()
不过使用grid应该怎样实现呢,本来也打算新建个Text,还有Scrollbar,然后进行关联,尝试了几次发现都不成功,搜索发现原来是有ScrolledText的,自带滚动条的Text,那就方便多了
self.outputText = ScrolledText(self, width=70, height=35)
self.outputText.grid(sticky=tk.N, row=0, column=1, rowspan=3, padx=(10, 30), pady=(30, 50))
(四)弹出新窗口与窗口居中
弹出新的窗口,使用Toplevel组件可以完成,新的窗口也像根窗口一样,可以用来布局,添加组件
代码如下:
#!/bin/env python
# -*- coding: utf-8 -*-

'''
Demo about tkinter's Toplevel and center it
'''

import tkinter as tk
import tkinter.ttk as ttk


class Application(tk.Frame):
    def __init__(self, master=None):
        super(Application, self).__init__(master, width=800, height=400)
        self.grid(sticky=tk.N+tk.S+tk.E+tk.W)
        self.grid_propagate(0)
        self.label()
        self.grid_info()
        self.center(self.master)
        self.counter = 0

    def center(self, win):
        win.update_idletasks()
        width = win.winfo_width()
        height = win.winfo_height()
        x = (win.winfo_screenwidth() // 2) - (width // 2)
        y = (win.winfo_screenheight() // 2) - (height // 2)
        win.geometry('{}x{}+{}+{}'.format(width, height, x, y))

    def create_window(self):

        self.counter += 1
        t = tk.Toplevel(self, width=400, height=200)
        t.grid_propagate(0)
        t.wm_title("Window #%s" % self.counter)   # t.title("title")
        l = tk.Label(t, text="This is window #%s" % self.counter)
        l.grid(padx=(30, 0), pady=(20, 0))
        self.center(t)


    def label(self):
        lf = ttk.Labelframe(self, text='label')
        lf.grid(padx=(30, 30), pady=(20, 0), ipadx=70)

        quitButton = ttk.Button(lf, text='New Window',
            command=self.create_window)
        quitButton.grid(ipadx=(30), padx=(30, 30), pady=(20, 20))

        print('---1---')
        quitButton.update()
        print(quitButton.winfo_width(), quitButton.winfo_height(), lf.winfo_width())

    def grid_info(self):

        print(self.grid_size())


app = Application()
app.master.title('Sample Application')
app.mainloop()
先这样,一些简单的记录,包裹些简单的脚本基本够用,有时间或者需要再进一步学习菜单什么的吧